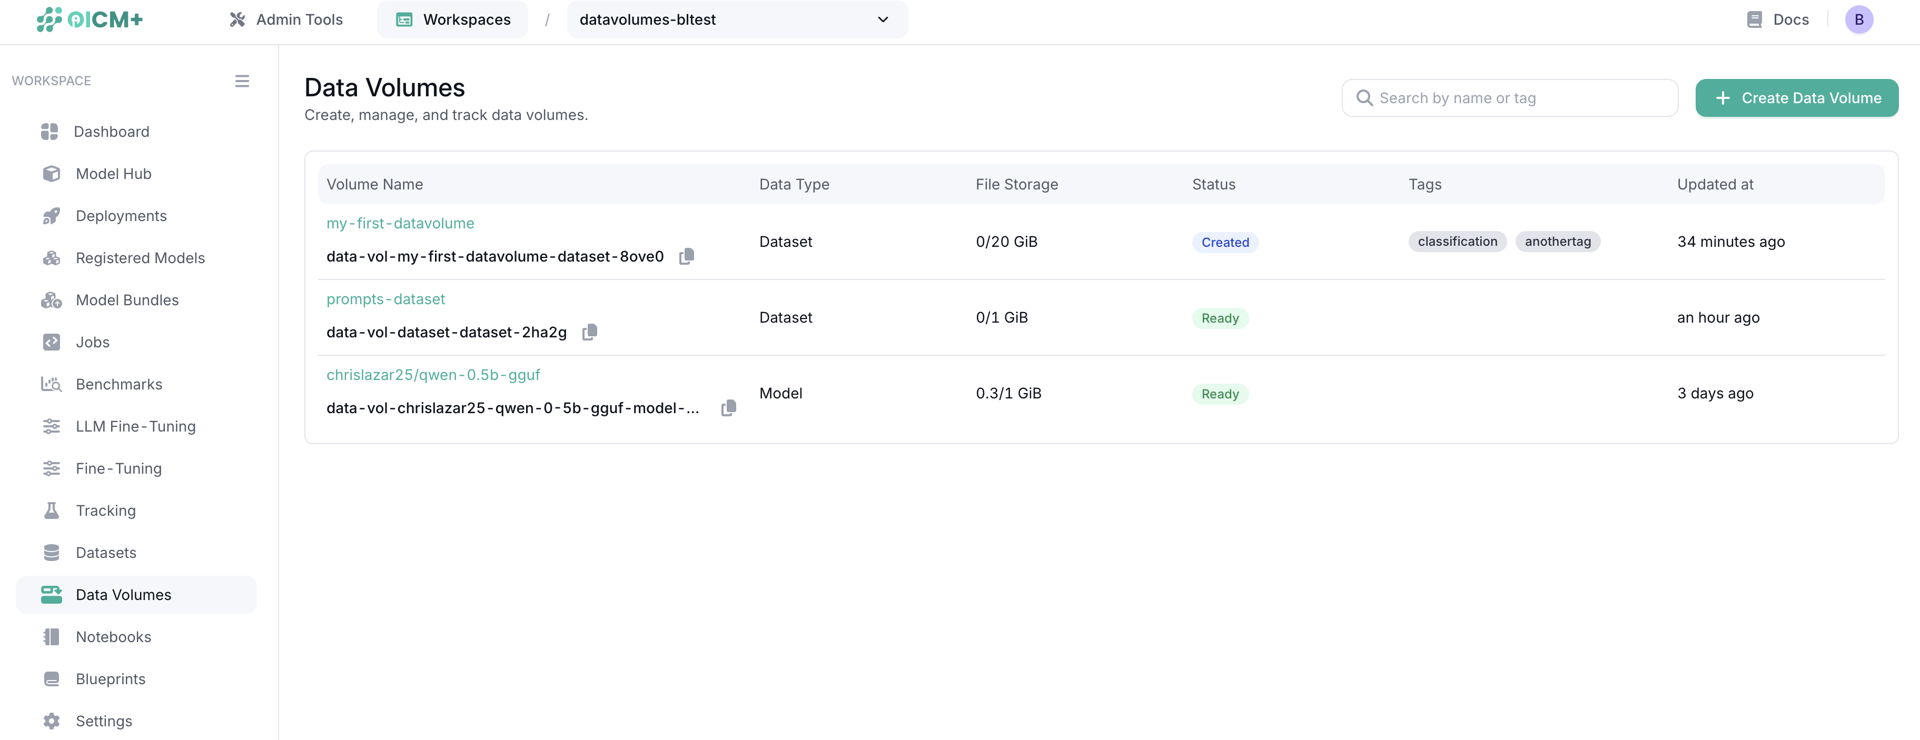
Data Volumes
Data Volumes in OICM provide a convenient way to manage data such as models, datasets, and other files required for AI workloads.
Data Volumes support two storage types:
- File Storage (FS): High-performance storage for fast and low latency access. Supports data imports from Hugging Face and external object storage.
- Object Storage (OBS): Cost-efficient storage for large datasets and training. Supports manual file uploads through the UI.
For File Storage (FS) volumes, OICM can be connected to external sources such as Hugging Face or an S3-compatible Object Storage. Data from these sources is fetched and stored in the Data Volume. For Object Storage (OBS) volumes, data is added via manual file upload through the UI.
Once created, Data Volumes make the stored data available to be attached to workloads within the same workspace.
How it works
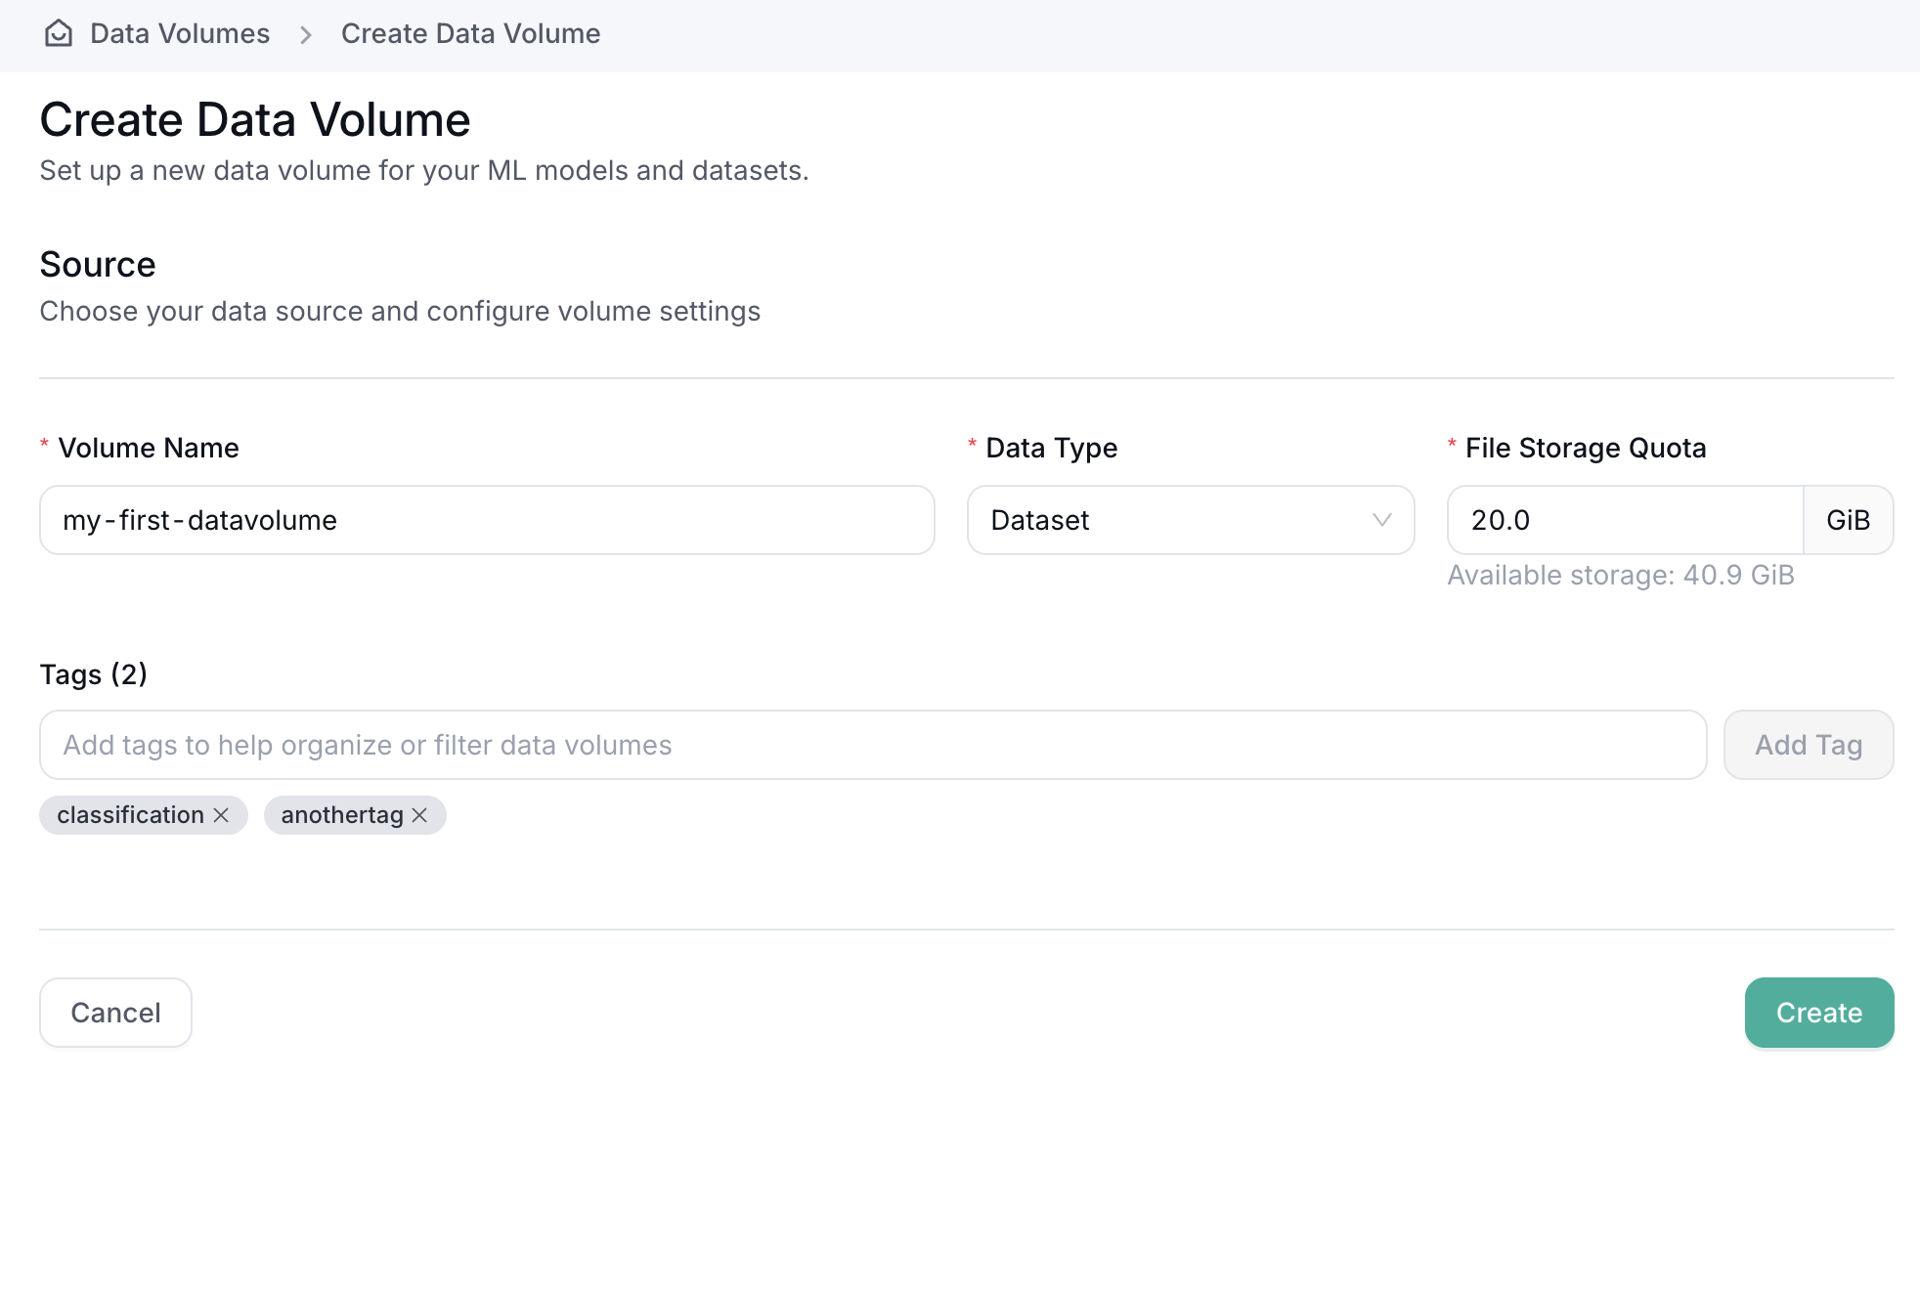
When you create a Data Volume, you define:
- Storage Type: Choose between File Storage (FS) or Object Storage (OBS)
- Name: A unique identifier for the volume
- Data Type: Choose Model, Dataset, or Other
-
Storage Quota: The maximum size the volume can reach (in GiB)
note: Make sure your workspace has enough quota for your allocations (FS or OBS, depending on the selected storage type)
-
Tags (optional): Add searchable tags to organize and filter volumes later
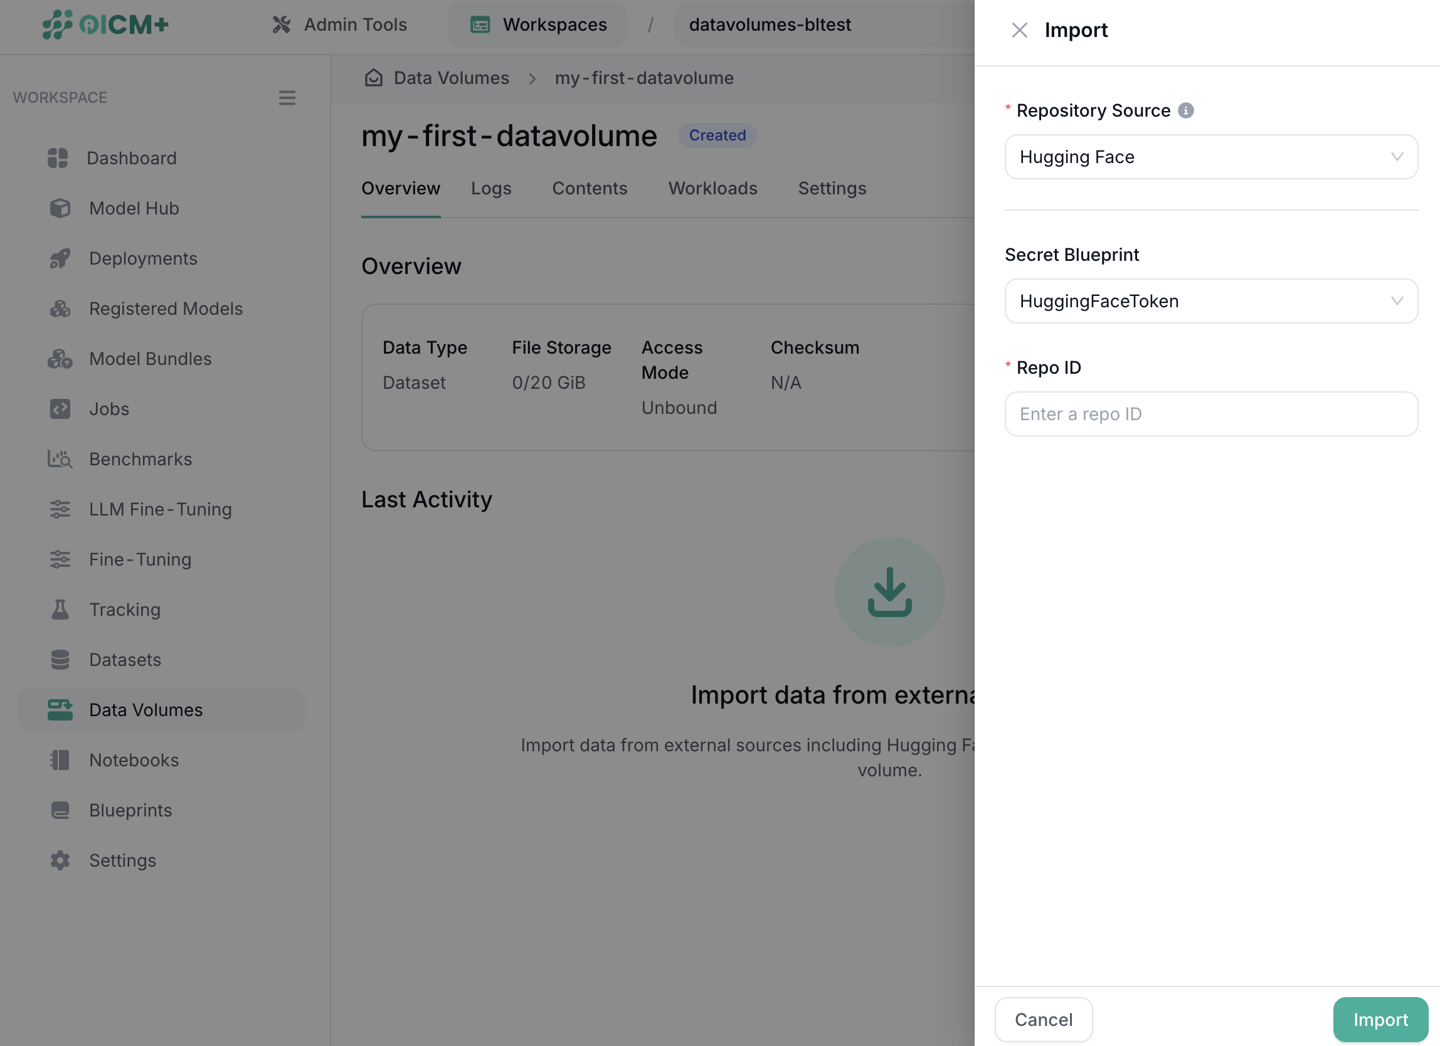
After creating the volume, you can import data into it. The available import methods depend on the storage type:
- File Storage (FS): Supports importing from external sources:
- Hugging Face (HF): Provide a saved secret blueprint containing your HF username and access token, then enter the repo name.
- OBS (S3): Provide the secret OBS blueprint, endpoint URL, bucket name, and directory.
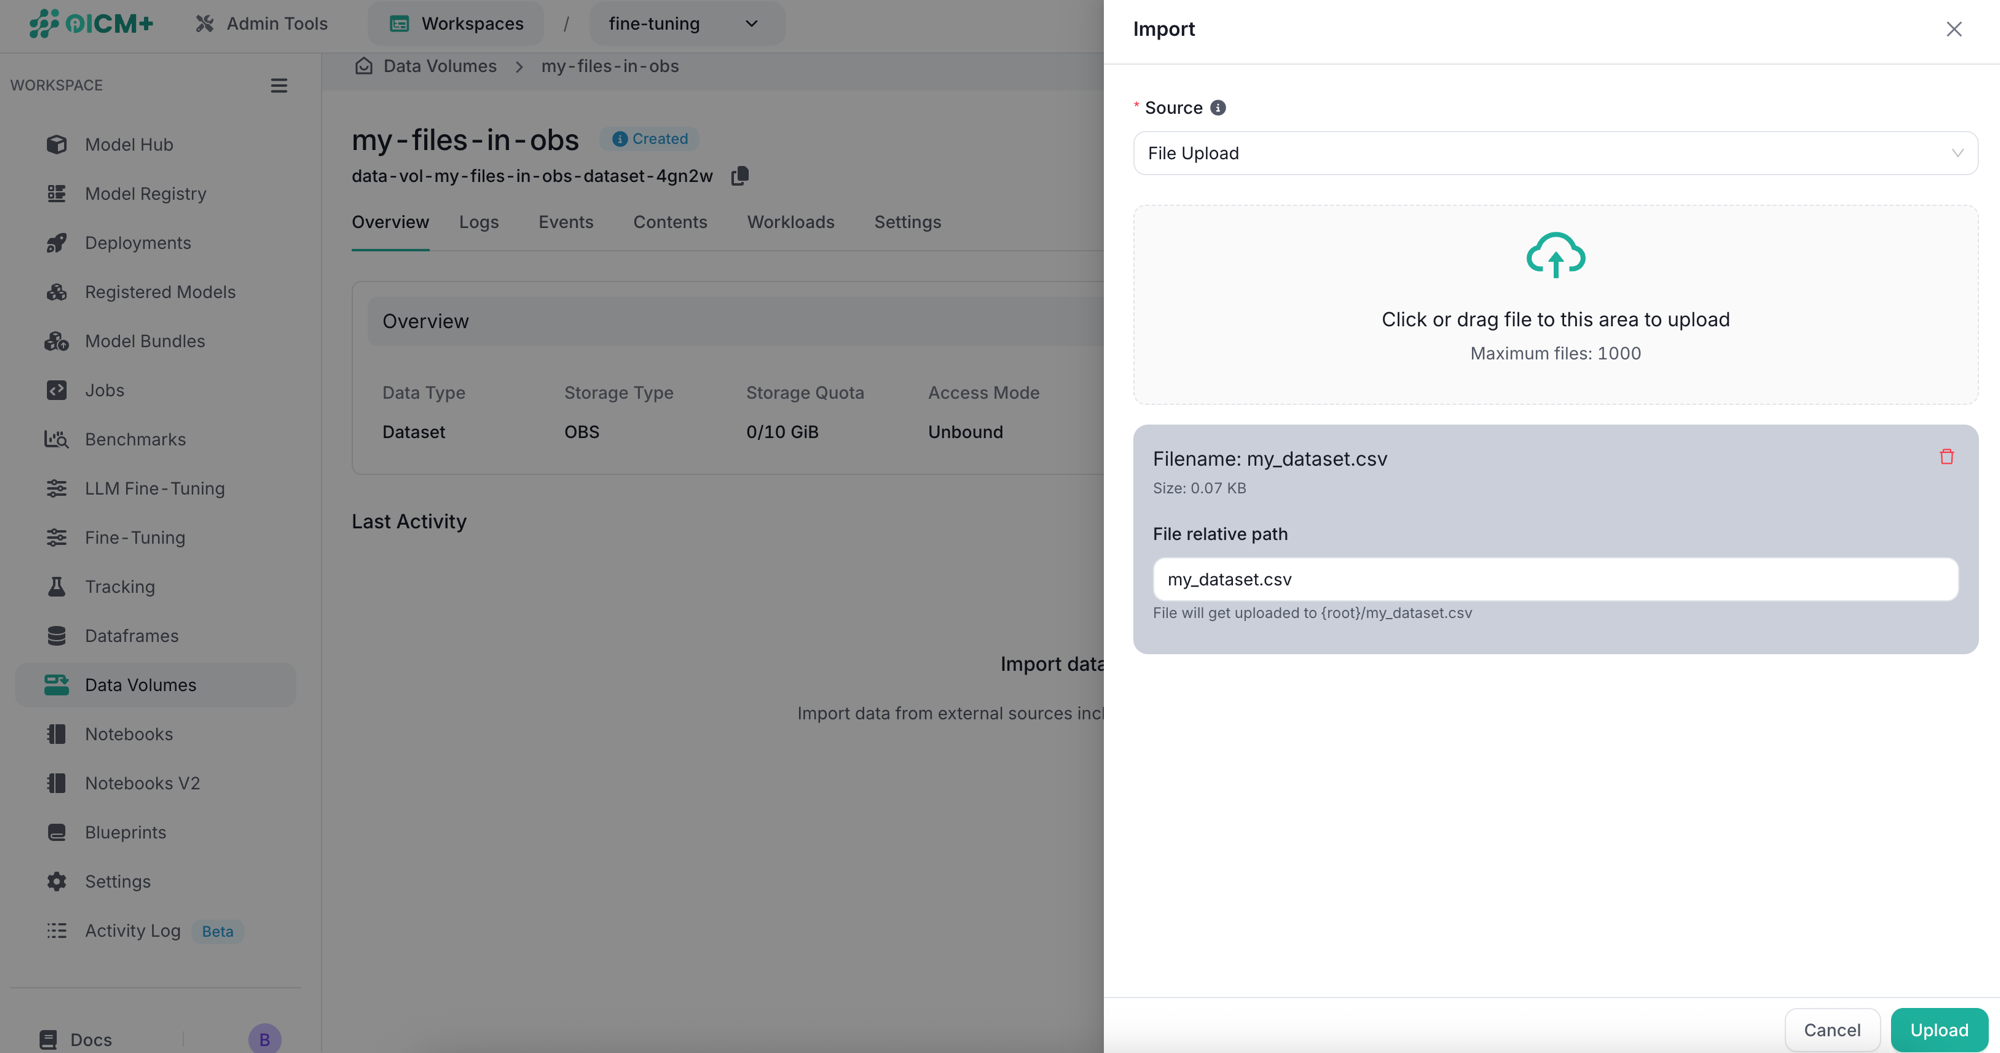
- Object Storage (OBS): Supports only manual file upload through the UI (see File Upload below).
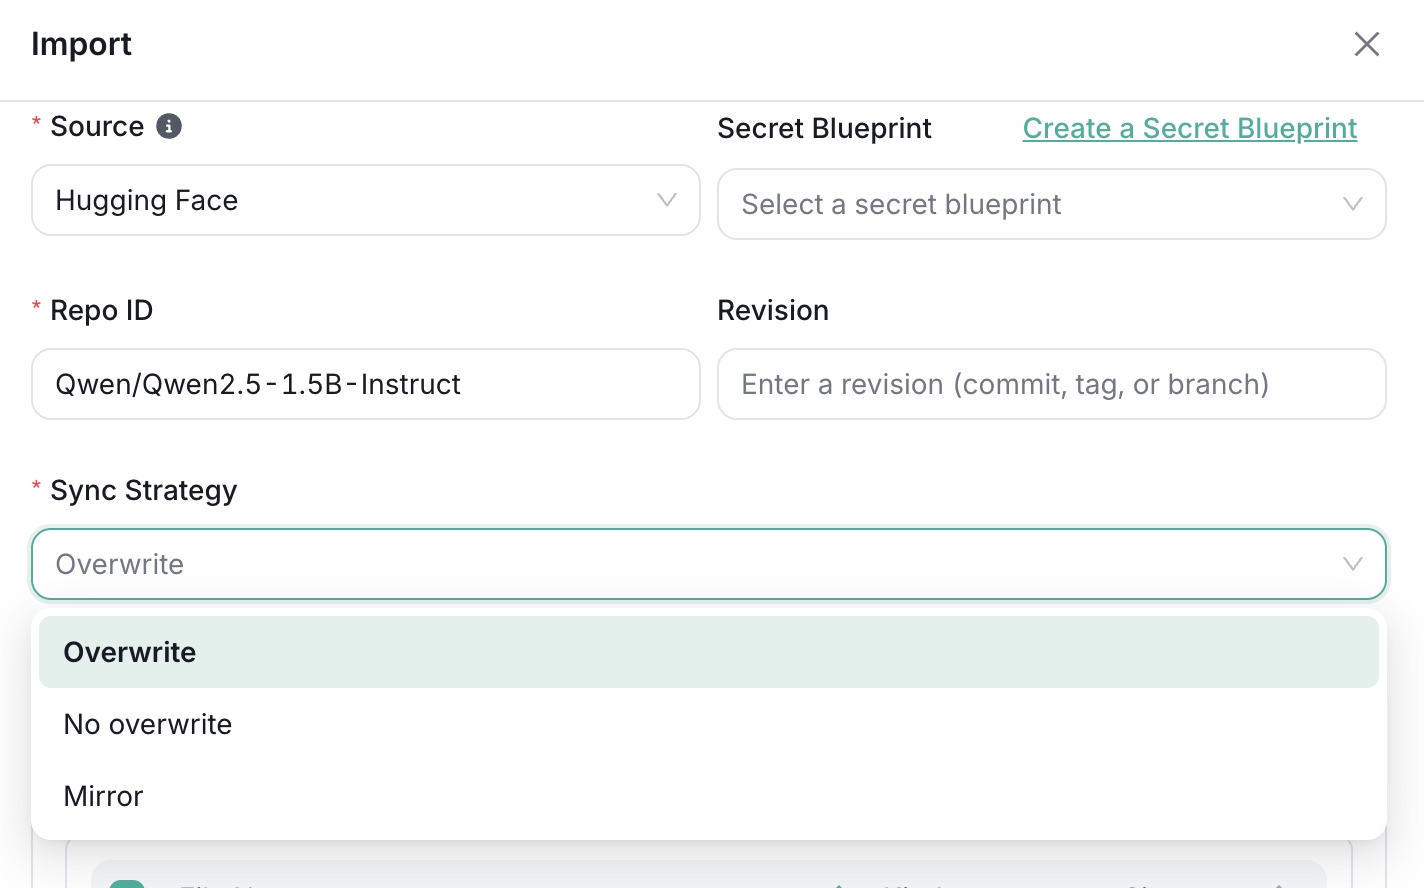
For FS import sources, you can specify a Source Directory to import only a specific folder instead of the entire repository or bucket. You can also set a Destination Directory to control where the imported data is placed within the Data Volume. If the destination is set to root (/), the entire Data Volume will be updated. The behavior of how files are handled at the destination depends on the selected Sync Strategy.
Once configured, OICM automatically syncs the data into the Data Volume when you click Import.
Sync Strategy
When importing or exporting data, you can choose a sync strategy that controls how files are handled when they already exist at the destination. The sync strategy is configured via a dropdown in the import/export dialog.
- Overwrite (default): Files with the same path are replaced. Existing unrelated files are preserved, and no files are deleted from the destination.
- No Overwrite: Files are copied only if they do not already exist at the destination. Existing files remain untouched and no deletions occur.
- Mirror: The target directory becomes an exact copy of the source. Files not present in the source are deleted within the target scope.
Deployments with OBS
For Deployments with Data Volume, model weights in OBS needs to be in the root of the bucket.
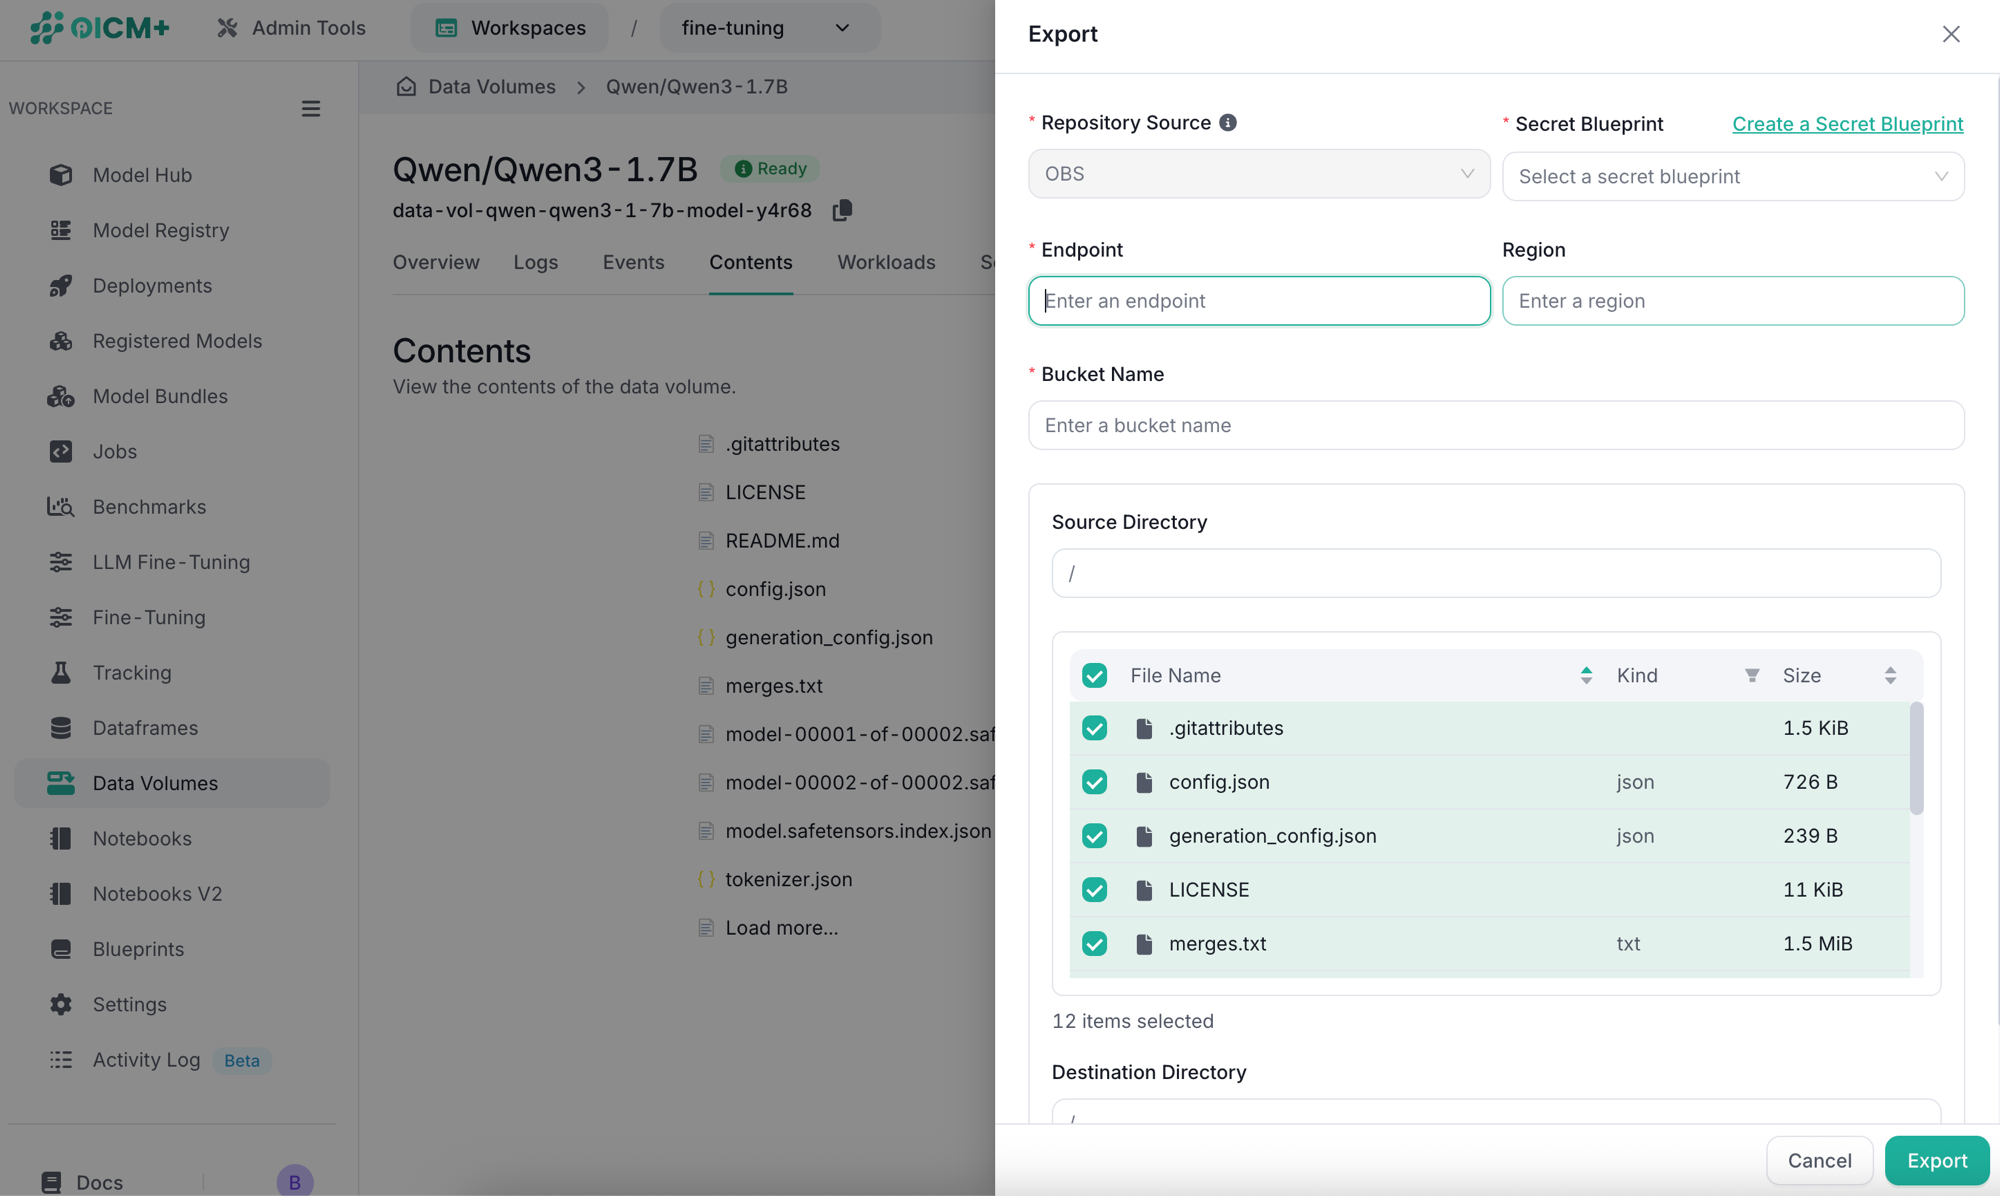
Exporting Data
Data Volumes support exporting data to an external OBS (S3-compatible storage). Provide the secret blueprint, endpoint, region, and bucket name. You can also specify a Source Directory to export only a specific folder from the Data Volume, and a Destination Directory to control where the data is placed in the target bucket.
File Upload (OBS only)
For Data Volumes with Object Storage (OBS) type, you can upload files directly through the UI. Click or drag files into the upload area, and optionally set a relative path for each file. If a file with the same name already exists, it will be replaced with the new one.
Workloads and Data Volumes
Data Volumes can attach to Workloads for reading or writing data. Supported workload types are:
- Jobs
- Fine-tuning
- Model deployment
Jobs
Job workloads can read from or write to Data Volumes. To connect, configure your config.yaml with the following options based on your needs:
Read Model
# Read-only access mounted at "/data-volumes/input_model"
input_model_data_volume:
  name: <identifier of the data volume>
Read Dataset
# Read-only access mounted at "/data-volumes/input_dataset"
input_dataset_data_volume:
  name: <identifier of the data volume>
Write Data
# Read-Write Access mounted at "/data-volumes/output_checkpoints"
output_checkpoints_data_volume:
  name: <identifier of the data volume>
Write Model
# Read-Write Access mounted at "/data-volumes/output_model"
output_model_data_volume:
  name: <identifier of the data volume>
Testing Read-Only Access
You can verify that your job can read from Data Volumes with this script:
import os

def print_tree(folder_path, indent=""):
    try:
        items = os.listdir(folder_path)
    except FileNotFoundError:
        print(f"{folder_path} does not exist.")
        return
    except PermissionError:
        print(f"{folder_path}: Permission Denied")
        return

    print(f"Folder {folder_path} is mounted")
    for index, item in enumerate(sorted(items)):
        full_path = os.path.join(folder_path, item)
        connector = "├── " if index < len(items) - 1 else "└── "
        print(indent + connector + item)
        if os.path.isdir(full_path):
            new_indent = indent + ("│   " if index < len(items) - 1 else "    ")
            print_tree(full_path, new_indent)

if __name__ == "__main__":
    paths = ["/data-volumes/input_model", "/data-volumes/input_dataset"]

    for path in paths:
        if os.path.exists(path):
            print(f"\nDirectory structure for {path}:")
            print(path)
            print_tree(path)
        else:
            print(f"\n{path} does not exist.")
Testing Read-Write Access
Use the following script to check write, read, and delete permissions:
import os

def check_dir_permissions(folder_path):
    test_file = os.path.join(folder_path, "test_permission_file.txt")

    if not os.path.exists(folder_path):
        print(f"{folder_path} does not exist.")
        return

    try:
        # Test write
        with open(test_file, "w") as f:
            f.write("permission test")
        print(f"Write OK in {folder_path}")

        # Test read
        with open(test_file, "r") as f:
            content = f.read()
        if content == "permission test":
            print(f"Read OK in {folder_path}")
        else:
            print(f"Read FAILED in {folder_path}")

        # Test delete
        os.remove(test_file)
        print(f"Delete OK in {folder_path}")

    except PermissionError:
        print(f"Permission Denied in {folder_path}")
    except Exception as e:
        print(f"Error in {folder_path}: {e}")

if __name__ == "__main__":
    paths = ["/data-volumes/output_model", "/data-volumes/output_checkpoints"]

    for path in paths:
        print(f"\nChecking permissions in: {path}")
        check_dir_permissions(path)
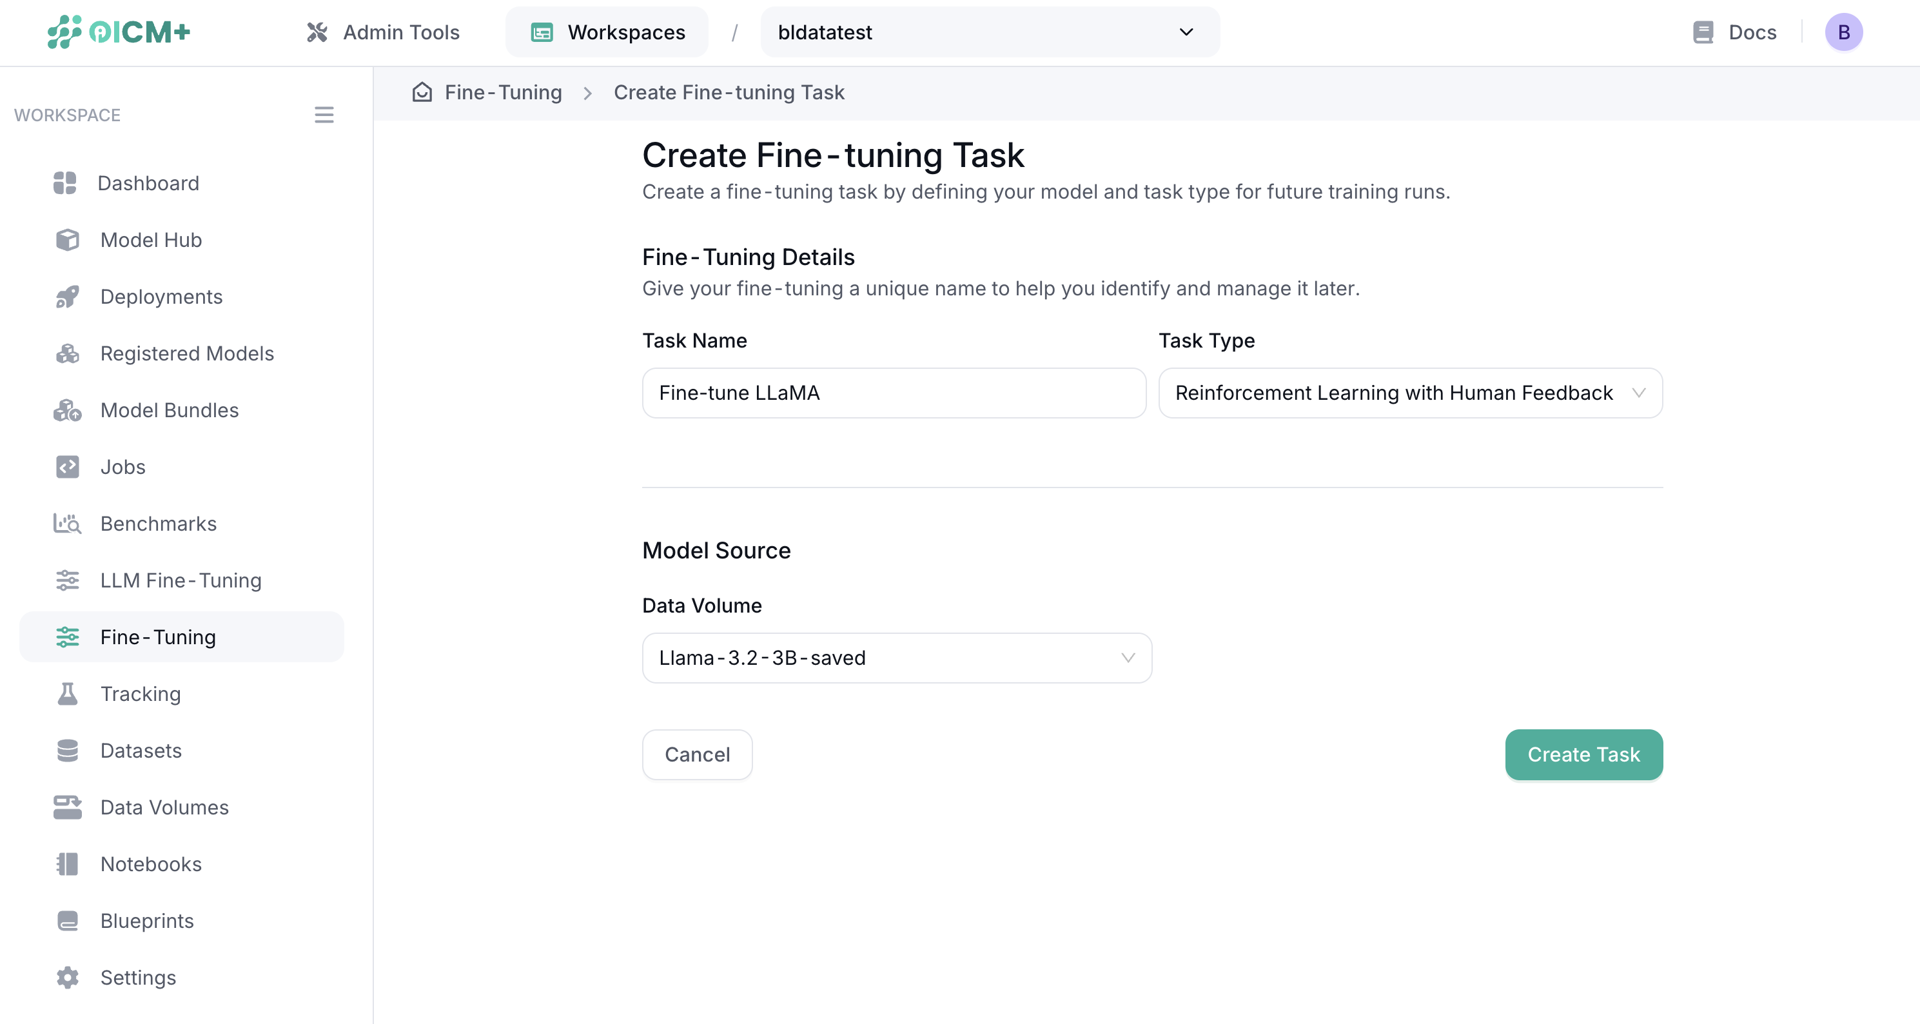
Fine-Tuning
You can import a model from Hugging Face or from an external OBS into a Data Volume for later fine-tuning. Once you import your data into a Data Volume of data type model, it will appear under Model Source and can be selected when creating a Fine-Tuning Task.
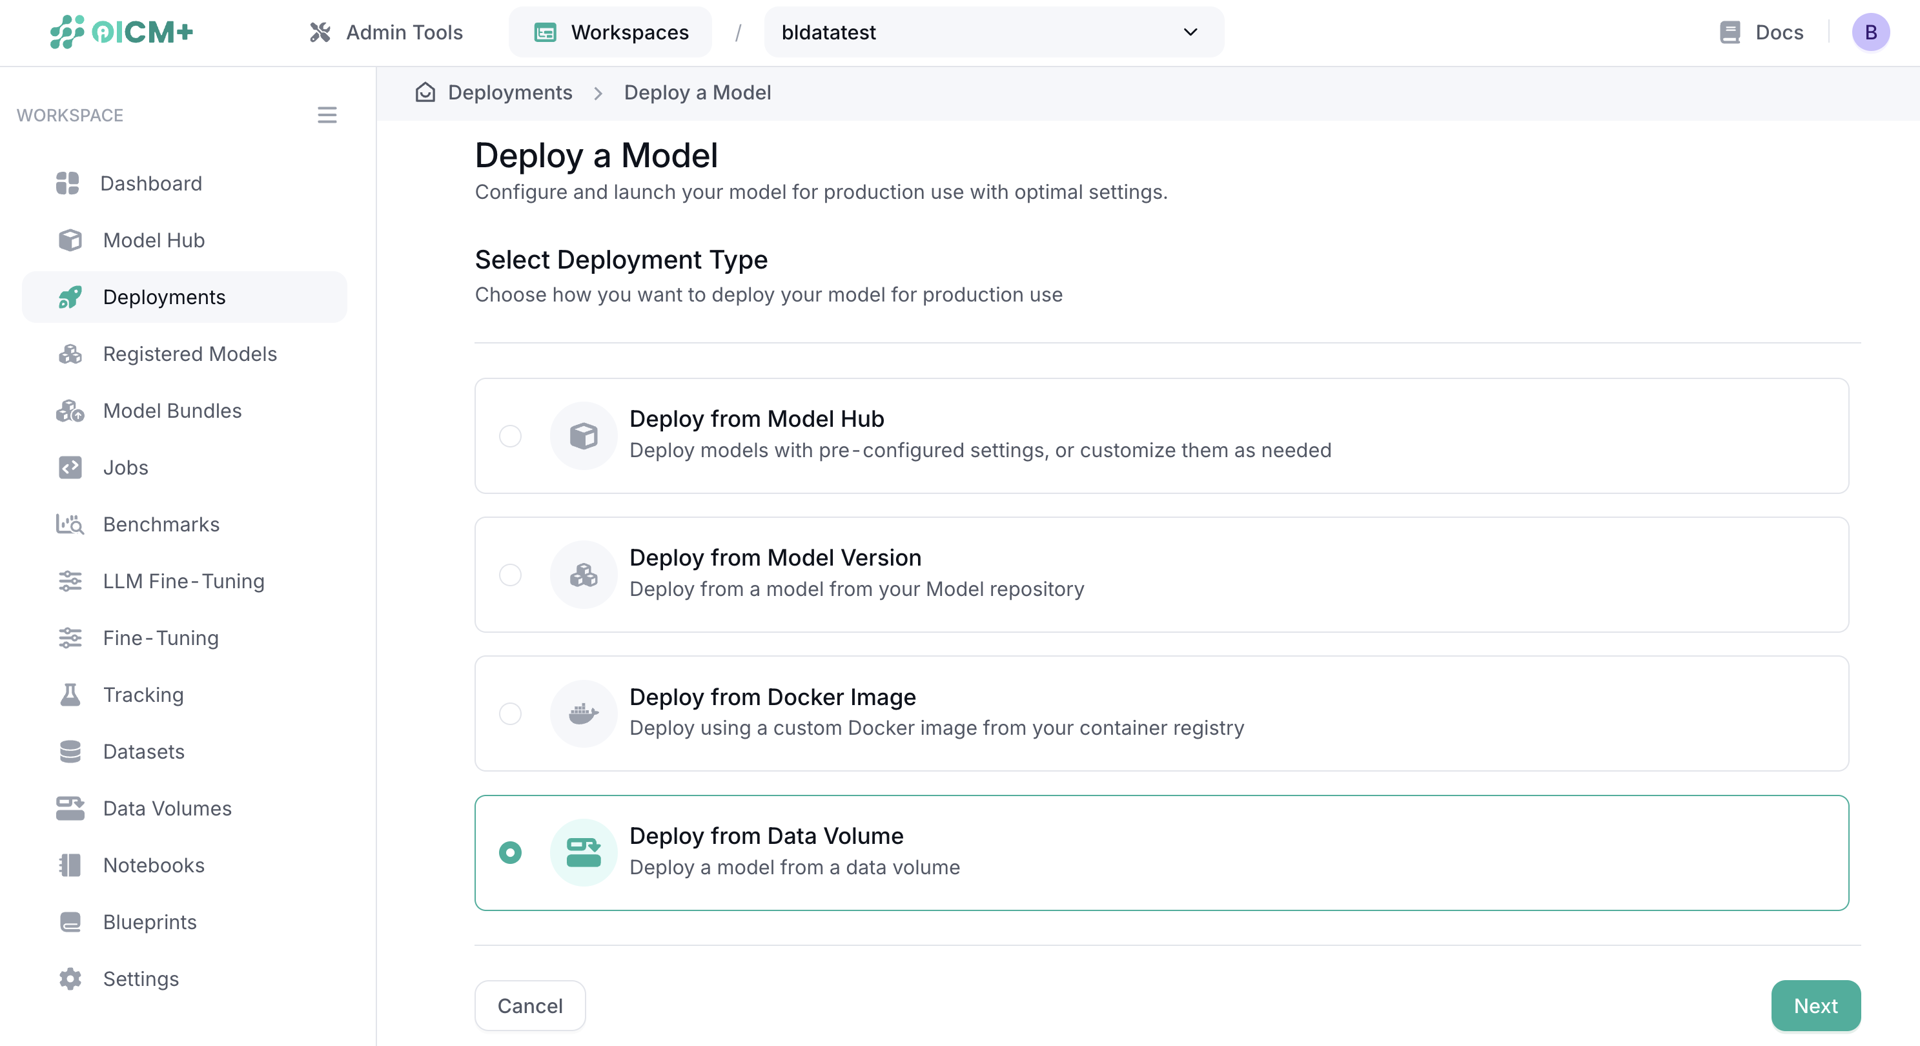
Model Deployment
You can deploy a model directly from a Data Volume. This is the most efficient and fastest way to deploy a model since the data is already in the platform and does not need to be fetched from an external source every time you need to deploy the model. A single Data Volume can be used for multiple model deployments.
note: When deploying using Data Volume, the name of the deployment should be used for the model in Open AI compatible endpoint for inference.
Verifying Data Volume Checksum
This guide explains how to verify the checksum calculated by our platform for your data volume. The checksum ensures data integrity by creating a unique fingerprint of your entire directory structure and file contents.
How the Checksum Works
Our platform uses the BLAKE3 hashing algorithm to create a hierarchical checksum that includes:
- File contents (hashed using BLAKE3)
- Directory structure
- File and directory names
- Symlink targets
The algorithm processes entries in alphabetical order to ensure consistent results across different systems.
Data Structure
For each directory, we create a manifest with entries in this format:
- Files:
f:<filename>:<blake3_hash_of_content> - Directories:
d:<dirname>:<blake3_hash_of_subdirectory> - Symlinks:
l:<linkname>:<target_path>
These entries are sorted alphabetically, joined with null bytes (\0), and then hashed with BLAKE3 to produce the final checksum.
Verification Method
Installation
Usage
Generate a checksum:
oic /path/to/directory

# OR invoke oip-checksum-validator via uvx, no permanent install needed
uvx --from oip-checksum-validator oic /path/to/directory
Verify against a reference checksum:
oic /path/to/directory -c <expected_checksum>

# OR invoke oip-checksum-validator via uvx, no permanent install needed
uvx --from oip-checksum-validator oic /path/to/directory -c <expected_checksum>
Example
For a directory structure:
The algorithm creates:
f:file1.txt:<blake3_hash_of_file1_content>d:subdir:<blake3_hash_of_subdir_manifest>l:link:file1.txt
These are sorted, joined with null bytes, and hashed to produce the final checksum.
Verification
Compare your calculated checksum with the one provided by our platform. If they match, your data integrity is confirmed.